PHP Tutorial: XAMPP Installation and configuration
- Prev
-
Topic List
Sec 1: Topics
Advance
Sect 3 : Quizzes
-
-
Discuss
-
Amit
How to Remove the Legend Colour Box in Chart JS
How to remove top legend/label color box in chartJS
-
Elango
What is the fixed GST rate for foods ?
Submit the list of food rates with GST
-
Elango
What is the fixed GST rate for foods ?
I need the GST related documents for searching the food rate after implementing GST. I am getting more friends in my college and business also. I have call all my friends for my home function. And all friends and my family members are go to restaurant for
-
Elango
I need great topic for me best essay services
-
Amit
Asdfa
-
Amit
How to send attachments with PHP Mail?
I need to send a pdf with mail, is it possible?
-
Amit
Enable & Disable a Div and its elements in Javascript
I am looking for a method to Enable and Disable the div id="dcalc" and Its children.
-
Amit
Json object
-
- Back To Tutorials
XAMPP Installation and configuration
XAMPP: Cross-Platform (X), Apache (A), MySQL (M), PHP (P) and Perl (P).
It is a simple, lightweight Apache distribution that makes it extremely easy for developers to create a local web server for developing locally php application for testing purposes. Everything that you need for developing an application like a web server - server application (Apache), database (MySQL), and scripting language (PHP) - is included in a simple extractable file.
XAMPP is also cross-platform, which means it works well on Linux, Mac and Windows. Since most actual web server deployments use the same components as XAMPP, it makes a local web server to a live server is extremely easy as well.
XAMPP Components:
1. Apache: Apache is the web server application that processes and delivers web content to a computer. Apache is the most popular web server online.
2. MySQL: Every web application, simple or complicated, requires a database for storing collected data. MySQL, which is open source, and the world's most popular database management system.
3. PHP: PHP stands for Hypertext Preprocessor. It is a server-side scripting language that powers some of the most popular websites in the world, including WordPress and Facebook. It is open source, relatively easy to learn, and works perfectly with MySQL, making it a popular choice for web developers.
4. Perl: Perl is a high-level, dynamic programming language used extensively in network programming, system admin, etc. Although less popular for web development purposes, Perl has a lot of niche applications.
Different versions of XAMPP may have additional components such as phpMyAdmin, OpenSSL, etc. to create full-fledged web servers.
XAMPP Installation:
There are so many versions are available for XAMPP Sever, we recommend to download latest version:
You can download XAMPP from here.
Follow these steps for installing XAMPP:
- Double click on XAMPP installer (.exe file) for starting installation.
.jpg)
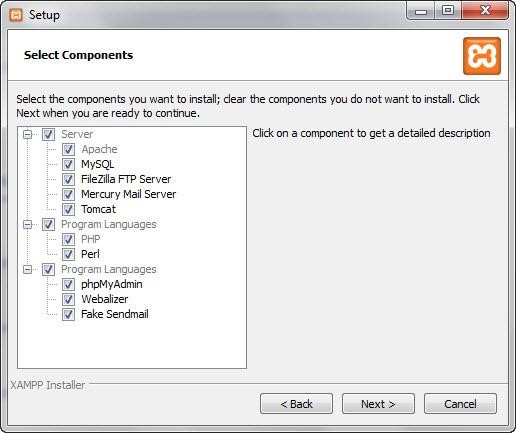
2. Click on next to proceed. In next screen you can select the components that you want to install. Choose the options and click on next.
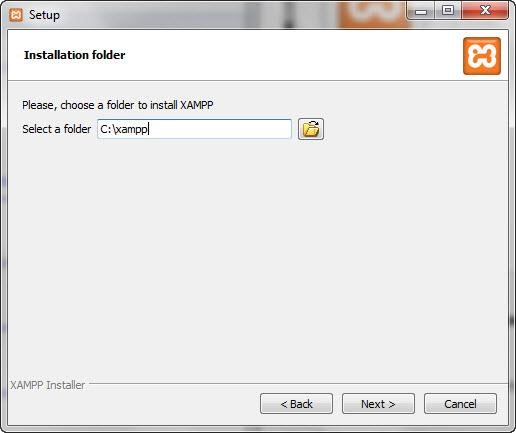
3. In this step choose the folder where you want to install XAMPP. This folder will hold all your web application files.
4. Click on next to complete your installation
.jpg)
5. Setup is now ready to install XAMPP. Click next and wait for the installer to unpack and install selected components. This may take a few minutes. You may be asked to approve Firewall access to certain components (such as Apache) during the installation process.
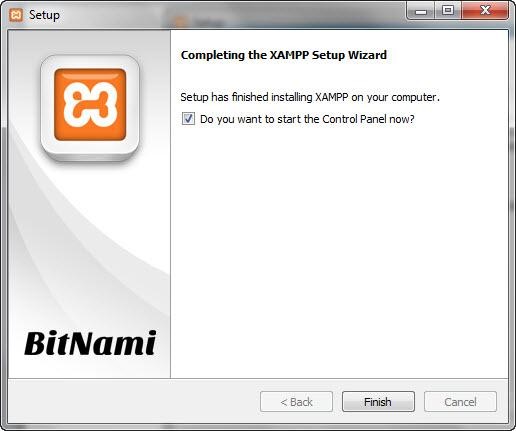
Installation is now complete! Select the 'Do you want to start the Control Panel now?' checkbox to open the XAMPP control panel.
XAMPP Control Panel
The XAMPP control panel gives you complete control over all installed XAMPP components. You can use the CP to start/stop different modules, launch the Unix shell, open Windows explorer and see all operations running in the background.
.jpg)
Testing Your XAMPP Installation
Step 1: In the XAMPP control panel, click on 'Start' under 'Actions' for the Apache module. This instructs XAMPP to start the Apache webserver.
Step 2: Open your web browser and type in: http://localhost or 127.0.0.1
Note: 127.0.0.1 is the default ip address of our system you can also change this.
Step 3: Select your language.
.jpg)
Step 4: You should see the following screen. This means you've successfully installed XAMPP on your computer.
.jpg)
Step 5: Now, we can test and run our script. To do this, you can use notepad or any other IED for writing your PHP code.
Open your notepad and write the following line of PHP Script:
echo 'Hello world';
?>
Save this file as 'test.php' in c:\xampp\htdocs\ (or whichever directory you installed XAMPP in).
Type the url 'localhost/test.php' in your browser. You should see the 'Hello World' message:
Hello World!
Congratulation, you have successfully installed the XAMP server. Enjoy programming.
Next Topic